

How to create a Google Analytics 4 (GA4) account the right way
Do you want to get started with Google Analytics 4 but don't know where to start? Setting up a Google Analytics 4 (GA4) account the correct way is very important, as it will save you lots of time later on. We will guide you through the registration process and explain the dos and don'ts of configuring it to your liking.
As you might already know, Google Analytics 4 is cloud-based. It's not a downloadable program you run on your computer. As a GA4 user, to use GA4 you will have to log in to the Google Analytics website through your browser. However, data won't magically appear within your GA4 account. To have data about your websites in your GA4 account, you will have to create a link between your website and your GA4 account. This data will then be stored on Google's servers and become visible in your Google Analytics 4 account for you to view and analyze. So, let's start and create your very own Google Analytics 4 account.
Remark: Google is constantly updating the sign-up process, as well as GA4 itself. It is entirely possible that the images below may look different compared to what you're seeing on your screen. Don't worry, because the registration will look broadly the same.
Step 1. Visit the Google Analytics website

The very first step in creating a Google Analytics 4 account is to visit the Google Analytics website. To create an account, click on either of the blue 'Get started today' buttons.
Step 2. Log in to your Google account

To use Google Analytics 4, you will need to have a Google-account. If you already own a Google account, simply log in here, and skip to step 3 in this guide. If you don't own a Google account, you will be able to create one by clicking on the 'Create account' link.
If you're not sure: if you own a gmail account, you own a Google account. You'll be able to login here with your Gmail account. However, it might be better to create a new Google account solely for business purposes.

Select the 'For work or my business' option. Then follow the steps (name, gender, birthday, etc.) until you have successfully created a Google-account and logged into it.
Step 3. Create a GA4 account

After having logged into your Google account, you will be welcomes by the screen above. Click the blue 'Start measuring' button to start the GA4 account creation process.

You will then see the screen above. Let's walk through it step-by-step.

To start, you will need to come up with a GA4 account name. Choose an account name which relates to your organization or company. Most people will enter their company name here. Although it's possible to change your account name afterwards, it is still best to come up with a suitable name from the get-go. To put things into perspective, let's briefly talk about how your GA4 account relates to your Google account.
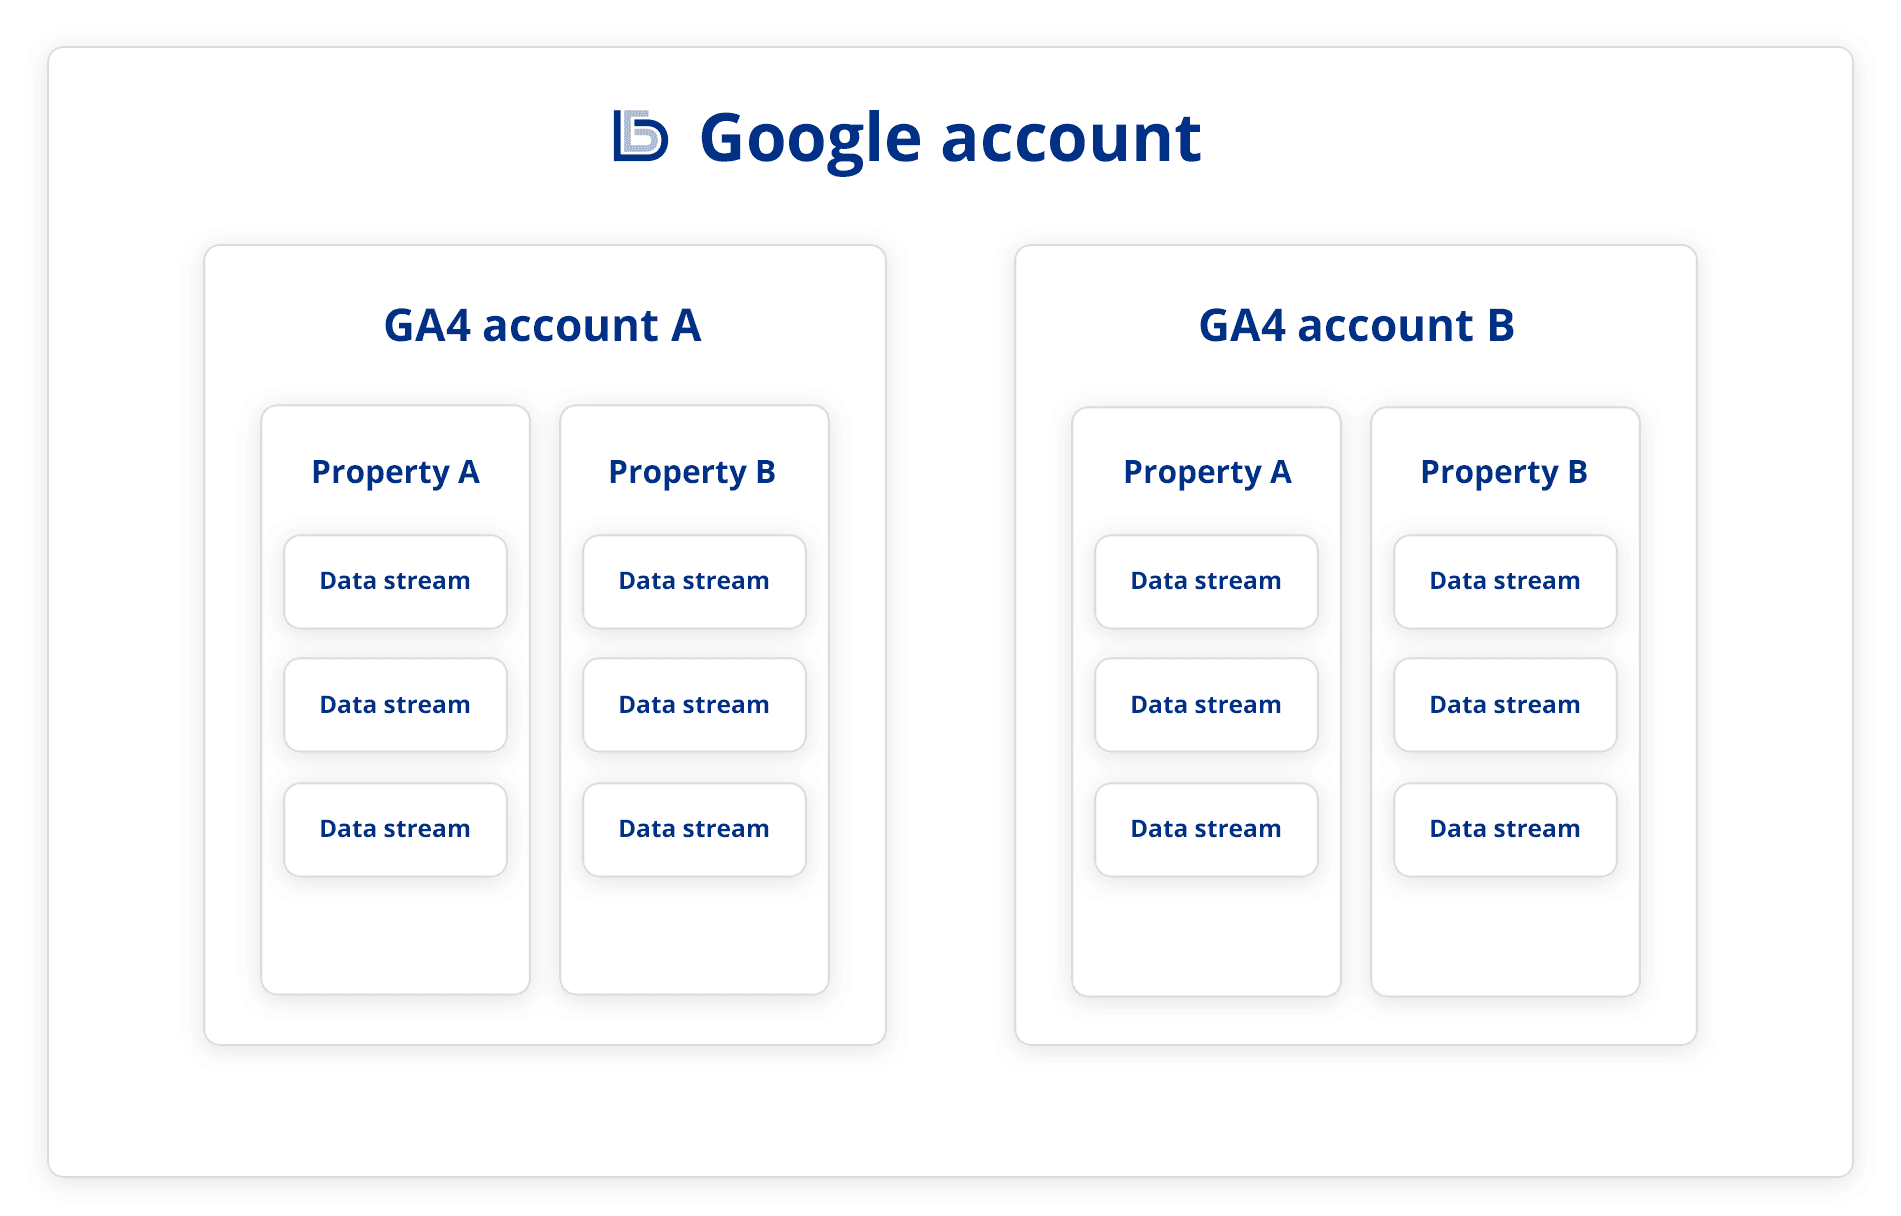
In the GA4 hierarchy, your Google account is the highest level. Within your Google account, you can have multiple GA4 accounts. Within your GA4 account, you can have multiple properties, which in turn can contain multiple data streams. (More on that later.) All of this might sound a bit confusing, so, for now just know that your Google account is the highest level, and that your GA4 account, which is what we're creating right now, falls below it. In most cases, you will create one GA4 account per organization. If you're an agency which manages GA4 for customers, you will most likely create a new Google account for each customer rather than placing multiple customers in one Google account.

After choosing a GA4 account name, you will be able to choose what information you are willing to share with Google. Although none of these options are mandatory if you want to use GA4's basic functionalities, you will be limited in using specific additional features within GA4.
Google products & services - If you choose to uncheck this option, the data you will see in your GA4 reports will be somewhat different compared to if you would enable this option. By unchecking Google's product & services, you will only see general information from your website visitors, because the demographic data (such as age and gender) and interests of individual visitors will not be taken into account. If you choose to enable this option, you will have to mention this in your cookie notification. It's essentially a trade-off between more detailed reporting and the privacy of your users.
Modeling contributions & business insights - By checking this option, you will be able to compare your (anonymized) website data with other websites in your industry. For example, you will be able to compare your website's average session duration, bounce rate and conversion rate with those of similar websites. If you do not check this option, you will not have the possibility to benchmark.
Technical support - If you expect to be in need of Google's technical support, you will need to check this option. Without checking this option, customer service representatives will not have the ability to support you.
Accountspecialists - By checking this option, you're authorizing Google to contact you and provide you with support in setting up advanced tracking features, interpreting data, optimizing your account setup, etc. In all likelihood, this only applies to very large organizations with complex needs.
After (un)checking the desired options, click on the 'Next' button below.
Step 4. Create a property

Next we will create a property within our GA4 account. This is a good time to think about how you want to organize your Google Analytics 4 account, as it might differ from company to company. To do this you will first need to become familiar with the terms 'property' and 'data stream'.
During step 3, we briefly introduced you to the terms 'Google account' and 'GA4 account'. You have learned that your Google account is the highest level within the overall hierarchy, with GA4 account occupying second place. You have also learned that in most cases, one GA4 account is created per organization.
As can be seen in the image above, one step below your GA4 account you will find the term 'property'. A property in GA4 is a sort of container in which you collect all the data from your website or app. Within your property, you will be able to organize, compare and analyze the data. As shown in the image, you can have multiple properties in one GA4 account. In the image you will also see the term 'data stream'. A data stream is the lowest step in the hierarchy. It's probably easiest to see a data stream as a pipeline in which data is sent from your website to your property. Your GA4 property is provided with data from your website via a data stream. You can have multiple data streams per property.
It is important to think about how you would want to structure your GA4 account, because this structure will impact your GA4 reports. You will have to make choice in what you will consider a property, and what you will consider a data stream. For example, in case you have both a website and a mobile app, you may want to create a property for your website and separate property for your mobile app. However, it's also entirely possible to just create one property, within which you have your website and mobile app as separate data streams. Each choice has its pros and cons. For instance, within GA4 it is currently not possible to directly compare data from one property with data from another property, even if they share a GA4 account. If you had created a property for your website and a separate property for your mobile app, it would've been difficult to compare their performance against each other. Then again, if your website and app do share a property, it might be difficult to separate the data.
To make things a bit easier for you, below, we have listed the most common situations:
Website only - If you only have a website, the choice is easy. Simply create a property for your website as well as a data stream for your website.
Website + mobile app - If the website and app are part of the same user journey, you may want to choose to create a single property, containing a data stream for your website and a data stream for your app. This allows you to directly compare the performance of your website with the performance of your app, as they belong to the same property. If a separate GA4 property had been created for the website and app, this would not be possible within the GA4 interface.
Multiple website - If the websites are all part of the same user journey, it might be best to create a single GA4 property. However, if your organization owns multiple websites which all have separate services and purposes, it might be wiser to create a separate GA4 property for each website. E.g., suppose you have a website and a separate webshop (linked to different domain). If you refer customers from your website to your webshop in order to purchase your products/services, then both websites are part of the same user journey. In this case it might be best to create a single property. By having both websites be part of the same GA4 property, you will be able to track and analyze interactions on either. In fact, and this may make everything a bit confusing, in this case might only want to use one data stream for both your website and your webshop. (So, your website and webshop would share a single data stream.) In this situation, you will continue to measure your visitor's activities even if they do not stay on the same website. This is known as 'cross-domain tracking'.
One website + subdomains - In this case, it might be best to create a single property with one data stream for your entire website, including all subdomains. Suppose you have a website with the address 'your-website.com', as well as a subdomain for your blog with the address 'blog.your-website.com'. We would suggest you to create a single property with a total of one data stream, covering both your website and your blog.
One multilingual website - It is, of course, entirely possible to have a single website containing multiple languages. You will then need to ask yourself the following question: do I want the website data for all languages to be separated? If so, you will have to create a separate property per language. However, if you will want to be able to directly compare the website data for all languages, create a single property with a separate data stream for each language.
Comparing data of separate properties
Fortunately, there are solutions which allow you to compare data from individual properties. These are, however, entirely dependent on the amount of time, money and/or effort you want to invest. For example, it is possible to create a so-called 'roll-up property'. Simply said, this is an extra property in which you put the data together. Suppose you have a website and a mobile app and have created separate properties for your website and mobile app. It's also possible to then create an additional property containing the data from both your website and mobile app. If you're a Google Analytics 360 user, this is very easy. You will be able to simply create a new property and select other properties as a source. People with a regular Google account will have to manually create a new property and select your website and mobile app as data streams.
Another possibility would be to export your data from Google Analytics 4, import it into other tools and compare your data there. Industry standards would be Tableau (acquired by Salesforce) or Microsoft's Power BI, but even Google's own Looker Studio (formerly Google Data Studio) might be worth taking a look at. If you or your organization have more specific data comparison needs, we advice you to export your data to Google BigQuery. BigQuery is Google's cloud-based data warehouse solution. Here you can store, manage and analyze large amounts of data, which you can then import into Looker Studio, Tableau, Microsoft Power BI, or other tools.

After having decided on the structure for your GA4 account, you can now create a property. Firstly, give your property a name. Although it's possible to change your property name afterwards, it is preferable to come up with a suitable name at this step.

After having named your property, you will need to choose the correct country and time zone. It is advisable to use the actual country your business is located in, as well as the applicable time zone. Based on these settings, GA4 will determine when a day starts and ends. It does not necessarily matter in which country your website visitors are located. If they reside in a country with a different time zone, the time zone you choose here will still be leading. GA4 will be register their data based on the country and time zone you choose here. It's possible to change the country and time zone later on, however, this change will only be applied to new data and not retroactively to your old data.

Next, choose the currency which applies to your company. The currency you choose here will affect your reports, as the monetary values will displayed in the currency you choose here. After this you can continue by pressing the blue 'Next' button
Step 5. Describe your company

After this, you will need to choose an industry category and company size. None of these answers will affect your use of GA4. When you're finished, click the 'Next' button.
Step 6. Choose your business objectives

At this step you will need to choose your business objectives. Please note that the choices you make here will affect which standard reports you will see in GA4. As you can see on the image above, you will be presented with five objectives. It's possible to choose more than one goal, or, to choose the last option, which will automatically deselect all of your other choices. (It is not possible to combine the last option with one or more options above it.) If you are a novice Google Analytics 4 user, it is advisable to choose the 'Get baseline reports' option. It is, of course, always possible to change your business objectives at a later time.
Stap 7. Accept Google Analytics Terms of Service Agreement

Finally, you will have to agree to Google's terms of service agreement and possibly also to Google's additional terms with regard to GDPR. Firstly, if you're located outside of the United States, please select your country/region at the top left corner.

You will then have to check the boxes to agree to the terms and conditions and click on the 'I Accept' button. It is of course advisable to read them through carefully.
Step 8. Start collecting data

Finally, you will get the option to create a data stream for your website, Android app or iOS app. You will also be given the option to skip this step. If you are a beginner, you may want to skip this step for now. (We'll tell you more about this in another guide.) Right after, you will be taken to your brand new Google Analytics 4 account. Congratulations!
The next stop would be to link your website to Google Analytics 4. By far the best way to do this is through Google Tag Manager (GTM). GTM is a tool which helps you collect your website data and send it to your Google Analytics 4 account. To learn more about setting up and configuring GTM, check out part 1 of our Google Tag Manager for beginners guide.